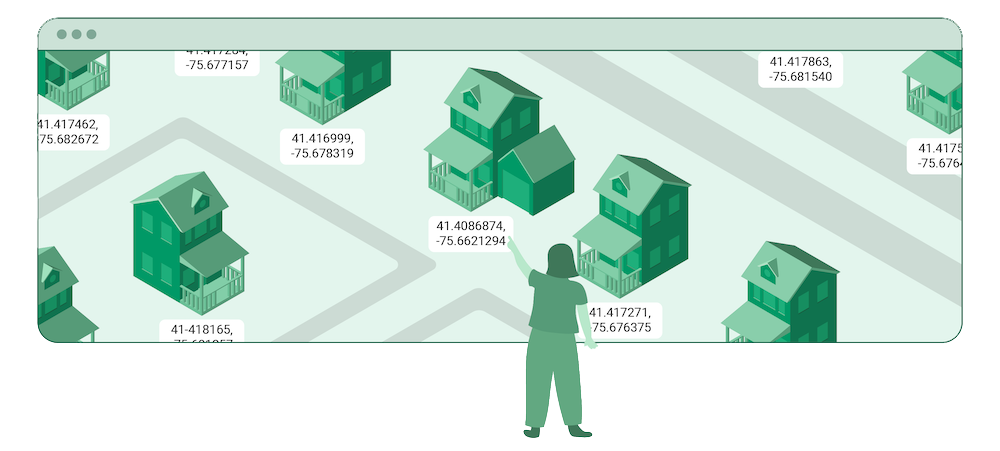
Reverse Geocoding Tutorial
Tutorial: building a reverse geocoder
Implementing a complete reverse geocoder is a big project. Before going all the way into this geospatial territory, you can dip a toe into its waters. In this tutorial, we'll help you do just that, by creating a reverse geocoder for the world's oceans. This simple example is small enough to easily implement, while being foundational for the types of problems reverse geocoding solves.
The world is made up of regions that can have unclear boundaries. This is especially true regarding bodies of water, as the oceans are all connected. Oftentimes maps have trouble with these regions. Many data sources, including OpenStreetMap, define oceans as a point. This helps them place labels on visual maps. However, that's not particularly useful for knowing if something else is in those regions. After all, a point has no area.
In this tutorial, we'll:
- Define geo data formats
- Describe how geo queries work
- Load some data into a database
- Use Python to reverse geocode programmatically
Download Geographic Data
As you explore geo data, you'll come across several file types. They are typically based on JSON, XML, or binary formats. They all have methods of describing points, lines, and shapes.
If you'd like to dive right into the tutorial, you can
download the oceans dataset
and skip this section.
We'll cover three common formats below:
- GeoJSON
- KML
- Shapefiles
GeoJSON
JSON, or JavaScript Object Notation, is a file format that's widely used due to it being human-readable and straightforward. It's derived from JavaScript, but essentially all modern programming languages can easily parse data within a JSON file.
JSON files contain name-value pairs, where the identifier of the value is set as the key in the form of a string, with that key's corresponding value delineated after a colon.
GeoJSON is a JSON-based format. Essentially, it provides a way to encode geographical data within a JSON file. It has specific geometries that can be set. The basic geometries include:
- Point
- LineString
- Polygon
{
    "type": "Point",
    "coordinates": [-164.91,30.52]
}
The coordinates (longitude, then latitude), in this case, are within the Pacific Ocean.
You can learn more about
GeoJSON on Wikipedia.
Another great GeoJSON resource is the site
geojson.io
where you can easily view and create GeoJSON files.
KML
Keyhole Markup Language, or KML, is an XML based geographic format. What JSON is to GeoJSON, XML is to KML. Extensible Markup Language (XML) is another human-readable format. XML files contain their information in tags. KML uses this notation to describe geographic features. Its features include:
- placemarks
- images
- polygons
- 3D models
<Placemark>
<name>Example Name</name>
<Point>
<coordinates>-164.91,30.52</coordinates>
</Point>
</Placemark>
</Document>
</kml>
Again, the coordinates list longitude first, and describe a point in the Pacific Ocean.
Shapefile
A shapefile, meanwhile, is a machine-readable geospatial vector data format. As it's not a human-readable format, the information can't be easily viewed or changed by a user in a text editor. However, it is a common format for use with GIS software, especially ArcGIS.
A shapefile format actually contains multiple files, however, which can be awkward to work with.
- .shp - the coordinates
- .shx - the index
- .dbf - database table containing attributes linked to the other two files
How Point in Polygon Queries Work
Geographic file formats give us the ability to place data in spatial relationships to one another. Imagine two polygons. There are three aspects of each polygon that determines their relationship to one another:
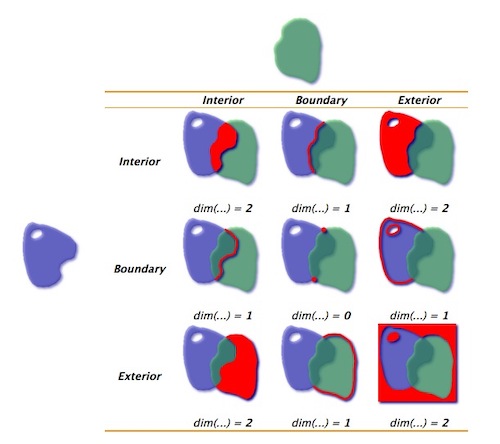 If we replace one polygon with a single point, the matrix simplifies. This is because a point is defined as having no boundary, as points have a dimension (and thus height and width) of zero.
We're concerned with knowing if a point is in the interior of a shape. The spatial predicate that matches what we are looking for is the *within* predicate. We'll also need the actual information of the point and the polygon, however, if we are to see if that point is within that polygon.
Points and polygons are defined by their coordinates. Points have a single set of coordinates, while a polygon has many sets of coordinates that define the points that line up to form its boundaries.
The coordinates of these objects need to have a spatial reference to be accurate. This is because there are different geographic coordinate systems of our three-dimensional Earth. These models differ because they have to address all the irregularities that prevent the Earth from being a perfect sphere. A set of coordinates will mean one specific place on Earth's surface in one geographic coordinate system, and another place in a different system.
This concept of differing models comes into play again when projecting those three-dimensional points onto a two-dimensional map.
Each geographic coordinate system has specific ideal use-cases, depending on what they emphasize in their model. Likewise, each projected coordinate system has an ideal use-case dependent on what aspect of the Earth you want to distort the least as you project it.
So, you'll need to choose the reference system that your coordinates are taken from. With that, you have all the geographic information you need to see if one point on the Earth's surface is within a certain area.
Once the coordinates and their systems are defined, databases like OpenGIS use spatial indices to determine spatial relationships. The index consists of the bounding boxes of all the geometric features. A bounding box is simply the smallest possible box that would cover the whole shape. The database would then use this index to see how the bounding boxes of objects correspond to the other bounding boxes. Then, after narrowing down which features are possibilities, it runs the more precise calculations.
 With an understanding of how geographic data works, head on over to
download the oceans dataset
so we can get it into our database.
- Their interior. All the points that can be found within the polygon
- Their exterior. All the points that can be found outside the polygon
- Their boundary. The LineStrings (made up of points) that make up the polygon's edges
 If we replace one polygon with a single point, the matrix simplifies. This is because a point is defined as having no boundary, as points have a dimension (and thus height and width) of zero.
We're concerned with knowing if a point is in the interior of a shape. The spatial predicate that matches what we are looking for is the *within* predicate. We'll also need the actual information of the point and the polygon, however, if we are to see if that point is within that polygon.
Points and polygons are defined by their coordinates. Points have a single set of coordinates, while a polygon has many sets of coordinates that define the points that line up to form its boundaries.
The coordinates of these objects need to have a spatial reference to be accurate. This is because there are different geographic coordinate systems of our three-dimensional Earth. These models differ because they have to address all the irregularities that prevent the Earth from being a perfect sphere. A set of coordinates will mean one specific place on Earth's surface in one geographic coordinate system, and another place in a different system.
This concept of differing models comes into play again when projecting those three-dimensional points onto a two-dimensional map.
Each geographic coordinate system has specific ideal use-cases, depending on what they emphasize in their model. Likewise, each projected coordinate system has an ideal use-case dependent on what aspect of the Earth you want to distort the least as you project it.
So, you'll need to choose the reference system that your coordinates are taken from. With that, you have all the geographic information you need to see if one point on the Earth's surface is within a certain area.
Once the coordinates and their systems are defined, databases like OpenGIS use spatial indices to determine spatial relationships. The index consists of the bounding boxes of all the geometric features. A bounding box is simply the smallest possible box that would cover the whole shape. The database would then use this index to see how the bounding boxes of objects correspond to the other bounding boxes. Then, after narrowing down which features are possibilities, it runs the more precise calculations.
 With an understanding of how geographic data works, head on over to
download the oceans dataset
so we can get it into our database.
Boundaries into a Database
If you're working with large amounts of data, you may want it nicely organized in a database. This is true even with geographic data. If you do so, you can make GIS queries (such as spatial predicates) using SQL.
Install Postgres and PostGIS
First, you'll want to install a database management system. Postgres is a good choice if you're using geographical data because you can also get
PostGIS,
a software program that adds geographic object functionality to Postgres. The links for downloading both can be found on their respective websites. They are also available as packages in most Linux distribution repositories.
For example, they can be installed from the Arch Linux distribution package manager like so:
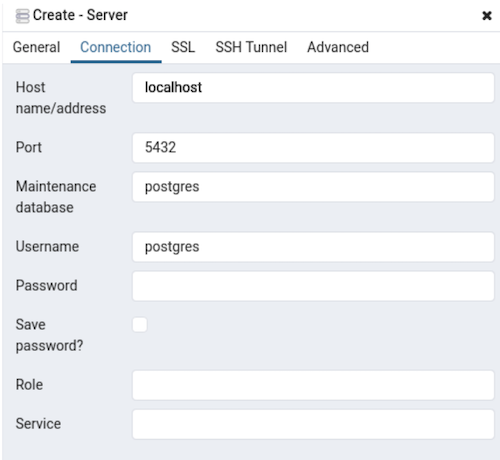 Then right-click on the server and create a database. Name it "oceans_db".
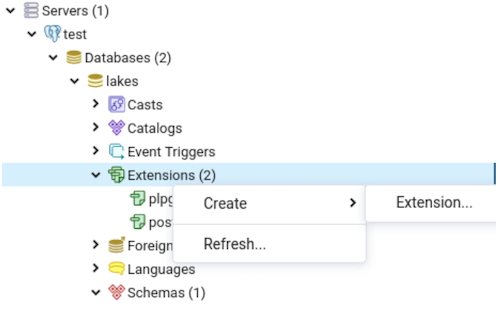
Next, you'll want to connect PostGIS to your database. This can be done by adding the extension in the extension sidebar, or with the following command using the Query Tool:
 And with that, you now have a PostGIS compatible Postgres database.
It's empty, though. Time to add data to it.
pacman -S postgresql
pacman -S postgis
Managing your database can be done via the command line or via a
graphic user interface such as pgadmin4.
pacman -S pgadmin4
A graphic user interface like pgadmin4 allows you to perform actions normally done in the command line. But before you use it, you'll want to login in as the user "postgres" via the command line.
sudo -iu postgres
Then you'll want to initialize the database cluster as that Postgres user.
The exact format of this will depend on your system:
[postgres]$ initdb -D /var/lib/postgres/data
Depending on your operating system, you may have to start and enable
postgresql.service. With that set up, open up pgadmin4 to create a server.
Right-click on "servers" and click create. For this example, we'll be
using a local server named "server1":
 Then right-click on the server and create a database. Name it "oceans_db".
Next, you'll want to connect PostGIS to your database. This can be done by adding the extension in the extension sidebar, or with the following command using the Query Tool:
CREATE EXTENSION postgis;
 And with that, you now have a PostGIS compatible Postgres database.
It's empty, though. Time to add data to it.
Add Boundary Data to Postgres
At this point, you could upload a shapefile to your database. That's one of the key reasons people use shapefiles today: GIS software is built with them in mind. As our boundaries are in the form of a GeoJSON file, we'll use a software called ogr2ogr to import it to PostGIS.
Install
ogr2ogr,
and then from the command line:
$ ogr2ogr -f "PostgreSQL" PG:"dbname=oceans_db user=postgres" "/path/to/file.geoson" -nln oceans
In this case, we're creating a table "oceans" for the data to go to.
If we were appending it to a pre-existing table, we'd use the flag
-append
at the end.
If you have multiple files, the simplicity of the ogr2ogr allows you to
import them quickly. For example, the command could be run in a Python
script like the one below while in a folder of the GeoJSON files:
import os

for i in os.listdir(os.getcwd()):
os.system(f'ogr2ogr -f "PostgreSQL" PG:"dbname=oceans_db user=postgres" "{i}" -nln oceans -append')
If you just have an object or two you want to copy over, and not go through the import procedure, you can also do so with the
ST_GeomFromGeoJSON
PostGIS command.
Ogr2ogr can handle many different file types, and PostGIS has commands for
many as well, so these methods will also work if you're using KML, for
example.
Try a PostGIS Query
With the data uploaded to a table in your database, you can begin querying it. If you're using pgadmin4, you can perform commands using the query tool found under "tools." Querying specific data from tables with SQL commands follows this general format:
SELECT *

FROM table_name

WHERE some_qualifer;
SQL is popular in part due to its easy-to-understand syntax. These commands are simply saying
 In the
SELECT
some data (if you want all of it, then use
*),
FROM
the table
table_name,
WHERE some_qualifer
is set to narrow the results.
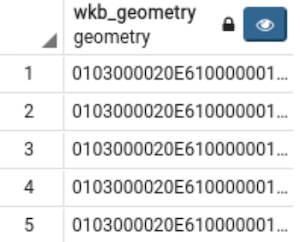
The column "wkb_geometry" contains the geometric data for each polygon. We can view the entire column like so:
SELECT wkb_geometry FROM oceans
 In the
WHERE
statement we'll specify we only want to query the body of water that
a certain point is in.
We need a set of coordinates. Using the
ST_Point
command, coordinates can be declaredin the form
(Longitude, Latitude)
like so:
ST_Point(-63.70,40.75)
As previously mentioned, these coordinates come from a coordinate system,
and the projection system needs to be identified. In this example,
the ID is 4326, which is
WGS 84,
a standard coordinate system. This is done with the
ST_SetSRID
command:
ST_SetSRID( ST_Point( -63.70,40.75), 4326))
Now, we can use the spatial predicate
Contains
to see if this point is in any of the polygons in our geometry column.
The general format for a point-in-polygon is:
ST_Contains(polygon, point)
Putting it all together, the WHERE command would be:
WHERE ST_Contains(wkb_geometry, ST_SetSRID( ST_Point( -63.70,40.75 4326))
Using this WHERE command to filter the search of our table is done like so:
SELECT *

FROM oceans_db

WHERE ST_Contains(wkb_geometry, ST_SetSRID( ST_Point( -63.70,40.75), 4326));
Running it will return which body of water, if any, that point is in. Our point is in the North Atlantic ocean, so that's what it shows!
And just like that, you can do the same with any point of your choosing. For greater ease-of-use, however, you can use this database to create a reverse geocoder in Python. Let's go over how to do that.
Write Your Reverse Geocoder in Python
With data loaded and queried in Postgres, you need to get the results to your code. Any modern language should be able to speak to Postgres, but we'll use Python here for readability.
Connect to Postgres
To follow, you'll need to install a few things. First, make sure you have Python 3 installed on your system. You can check what version you have with the following command:
$ python --version
You'll need the reverse geocoder to be able to access our Postgres database. We'll be using the Python package
Psycopg.
Psycopg is a Postgres database adapter that will allow you to create cursors to query databases. Install it via
pip:
$ pip install psycopg2`
With Psycopg installed, open up a Python environment. Then, import the Psycopg2 package:
import psycopg2
Now you can connect to your database. This is done using
psycopg2.connect()
Here, you'll provide your credentials needed to connect.
connection = psycopg2.connect(user = "", password = "", database = "")
In a production setup, you'd securely store this data in environment variables, but we'll keep it simple for this example.
Query the Database
With a connection established, let's try querying the database. First, establish a cursor as such:
cursor = connection.cursor()
With a cursor, you'll be able to execute SQL commands in a Python environment to query your database. You can then set that data to a Python variable and use it like any other.
The SQL command is contained in a single string. For readability, you can set the string to the first aspect of the command, and then append the next segments to the variable. The end result is a single string. For example:
command = "SELECT name "
command += "FROM destination_table "
command += "WHERE ST_Contains(wkb_geometry, ST_SetSRID( ST_Point( -63.70,40.75), 4326))"
This command is then executed via the cursor:
location = []
cursor = connection.cursor()
try:
cursor.execute(command)
for i in cursor:
location.append(i[0])
finally:
cursor.close()
Now, the list
location
has all the results that matched our query. As our point was in the North Atlantic Ocean, it returns that:
print(location)
['North Atlantic Ocean']
Our simple example has a single result, though it's still returned within an array. More complex geocoders might return multiple potential shapes and you might need to determine how to determine which results to display in what circumstances.
Return the Geocode Results
Now that you have a proof of concept, you'll want to get these results to the user. How you do this will be determined by your use case, but it's likely not printed through standard out. You'll want to prepare the data to be consumed by your application.
Some approaches that might make sense:
- Build an internal microservice geocoder
- Create a public API interface to call from a browser
- Make your call directly to the database in your application code
{
    "components": {
        "_category": "natural/water",
        "_type": "body_of_water",
        "body_of_water": "North Atlantic Ocean"
    }
}
The actual schema you use to describe your results is up to you. And whatever you do to access your geocoder, you'll want to display the name to users. You might also want additional contextual data from this or other geocoders.
Improve Your Reverse Geocoder
Now that you've finished a basic reverse geocoder, there are many ways it can be improved. From expanding the existing dataset to adding additional data, you'll likely need more than a proof of concept geocoder.
Your oceans dataset might require:
- More bodies of water
- More granularity within the largest oceans
- Translations of every body of water (for localization)
- Country and city boundaries
- Full addresses and landmarks
- Highways and roads
- Time zones
Continue with chapter 5
Reverse Geocoding Resources - OpenCage Reverse Geocoding Guide